“Jetson Nano系列教程7:TensorFlow入门介绍(三)”的版本间的差异
来自丢石头百科
(JetsonNano+TensorFlow入坑介绍3,JetsonNano上用TensorFlow运行MNIST手写数字数字集识别) |
小 (文本替换 - 替换“wget http://{{SERVERNAME}}”为“wget http://wiki.diustou.com”) |
||
| (未显示同一用户的1个中间版本) | |||
| 第68行: | 第68行: | ||
,在终端下输入下面命令测试: | ,在终端下输入下面命令测试: | ||
<syntaxhighlight lang="python"> | <syntaxhighlight lang="python"> | ||
| − | wget http:// | + | wget http://wiki.diustou.com/study/portal.php?mod=attachment&id=1640 |
unzip -o MNIST_TEST.zip | unzip -o MNIST_TEST.zip | ||
sudo python3 mnist_test.py</syntaxhighlight> | sudo python3 mnist_test.py</syntaxhighlight> | ||
2020年1月9日 (四) 17:43的最新版本
一、前言
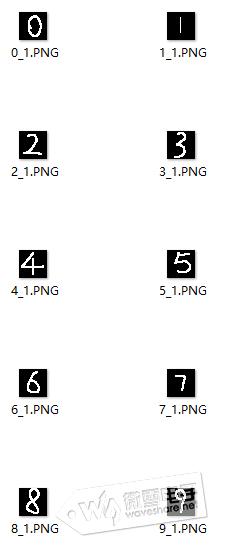
上篇用JetsonNano+TensorFlow跑MNIST手写数字分类的Demo,本篇通过PS生成的0~9共10个数字的28*28像素图片进行测试。 二、测试 生成黑底白字28*28像素的图片如下图所示:
上篇构建的神经网络基础上加入读取图片和运行测试相关代码
from tensorflow.examples.tutorials.mnist import input_data
import tensorflow as tf
#导入图片处理相关库
from PIL import Image
import numpy as np
from itertools import chain

#读取0~9其中一张图片进行测试,读者感兴趣可以尝试修改数字进行其它图片测试
image_tem = Image.open('./2.PNG')
image_array = np.array(image_tem)
image_array=np.asarray(image_array,dtype="float32")
image_array = list(chain.from_iterable(image_array))
image_array = [image_array]

mnist = input_data.read_data_sets("MNIST_data/", one_hot=True)

x = tf.placeholder(tf.float32,[None,784])
y = tf.placeholder(tf.float32, [None,10])

w1 = tf.Variable(tf.truncated_normal([784,1024]),dtype=tf.float32)
b1 = tf.Variable(tf.zeros([1,1024]),dtype=tf.float32)
a = tf.nn.relu(tf.matmul(x,w1) + b1)

w2 = tf.Variable(tf.ones([1024,10]))
b2 = tf.Variable(tf.zeros([1,10]))
y_= tf.nn.softmax(tf.matmul(a,w2) + b2)

#将图片输入到神经网络中去
b = tf.nn.relu(tf.matmul(image_array,w1)+b1)
y_image = tf.nn.softmax(tf.matmul(b,w2)+b2)

loss= tf.reduce_mean(-tf.reduce_sum(y*tf.log(y_),axis=1))
train_step = tf.train.AdamOptimizer(0.0001).minimize(loss)

init = tf.initialize_all_variables()
sess = tf.Session()
sess.run(init)
correct_prediction = tf.equal(tf.argmax(y_,axis=1), tf.argmax(y,axis=1))accuracy = tf.reduce_mean(tf.cast(correct_prediction,tf.float32))

for i in range(1000):
    batch_xs, batch_ys = mnist.train.next_batch(100)
    sess.run(train_step, feed_dict={x: batch_xs, y: batch_ys})

#待神经网络权重偏置调整完成后,直接运行待测试的图片
print(sess.run(y_image))
当读取图片数字为2的时候,实际测试结果如下,感兴趣读者可测试其它图片:
相关文件请点击右边下载 --> <a class="attach" href="portal.php?mod=attachment&id=1640" target="_blank">MNIST_TEST.zip
用户可使用SSH登录JetsonNano终端, 不熟悉用户点击我参阅SSH登录 ,在终端下输入下面命令测试:
wget http://wiki.diustou.com/study/portal.php?mod=attachment&id=1640
unzip -o MNIST_TEST.zip
sudo python3 mnist_test.py
以上资料由waveshare team整理
Tab标签: Jetson Nano系列教程 TensorFlow python

