“实验二:RGB彩灯实验”的版本间的差异
来自丢石头百科
Yousimaier17(讨论 | 贡献) |
Yousimaier17(讨论 | 贡献) (→主要程序) |
||
| 第10行: | 第10行: | ||
*[[File:实验二:RGB彩灯实验_接线1.png|400px]] | *[[File:实验二:RGB彩灯实验_接线1.png|400px]] | ||
| − | === | + | === 参考程序 === |
<pre> | <pre> | ||
int red = 3; //select the pin for the red LED | int red = 3; //select the pin for the red LED | ||
2024年8月9日 (五) 16:15的版本
目录
Arduino
实验现象
- RGB模块实现酷炫的灯光效果
实验原理
- 通过 R、G、B 三个引脚的PWM电压输入可以调节三种基色(红/蓝/绿)的强度从而实现全彩的混色效果
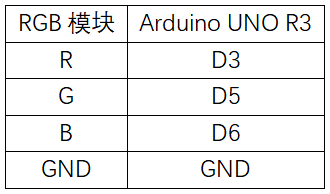
电路连接
参考程序
int red = 3;    //select the pin for the red LED
int green = 5;  // select the pin for the blue LED
int blue = 6;   // select the pin for the green LED
int val;

void setup()
{
 pinMode(red,OUTPUT);
 pinMode(green,OUTPUT);
 pinMode(blue,OUTPUT);
}
void loop()
{
  for(val=255; val>0; val--)
   {
     analogWrite(red,val);
     analogWrite(blue,128-val);
     analogWrite(green,255-val);
     delay(1);
   }
  for(val=0; val<255; val++)
   {
     analogWrite(red,val);
     analogWrite(blue,128-val);
     analogWrite(green,255-val);
     delay(1);
   }
}
