“实验十:DS18B20温度传感器实验”的版本间的差异
来自丢石头百科
Yousimaier17(讨论 | 贡献) (创建页面,内容为“首页 == Arduino == === 实验现象 === * 串口打印出检测的温度值。 === 电路连接 === * DS18B20传感器模块…”) |
Yousimaier17(讨论 | 贡献) (→电路连接) |
||
| (未显示同一用户的10个中间版本) | |||
| 第1行: | 第1行: | ||
| − | [[Basic Experiment Kits For Arduino | + | *[[Basic Experiment Kits For Arduino]] |
| + | *[[Basic Experiment Kits For Raspberry Pi]] | ||
== Arduino == | == Arduino == | ||
=== 实验现象 === | === 实验现象 === | ||
| 第5行: | 第6行: | ||
=== 电路连接 === | === 电路连接 === | ||
| − | * | + | *[[File:实验十:DS18B20温度传感器实验_接线.png|400px]] |
| − | |||
| − | |||
| − | |||
| − | |||
=== 安装库 === | === 安装库 === | ||
*'''安装DallasTemperature''' | *'''安装DallasTemperature''' | ||
**工具->管理库,搜索DallasTemperature,点击安装 | **工具->管理库,搜索DallasTemperature,点击安装 | ||
| − | **[[File:Arduino实验十一:DS18B20温度传感器实验_安装库1.png| | + | **[[File:Arduino实验十一:DS18B20温度传感器实验_安装库1.png|800px]] |
*'''安装OneWire''' | *'''安装OneWire''' | ||
**工具->管理库,搜索OneWire,点击安装 | **工具->管理库,搜索OneWire,点击安装 | ||
| − | **[[File:Arduino实验十一:DS18B20温度传感器实验_安装库2.png| | + | **[[File:Arduino实验十一:DS18B20温度传感器实验_安装库2.png|800px]] |
=== 主要程序 === | === 主要程序 === | ||
<pre> | <pre> | ||
| − | + | #include <OneWire.h> | |
| − | + | #include <DallasTemperature.h> | |
| − | |||
| − | + | #define ONE_WIRE_BUS 2 | |
| − | + | OneWire oneWire(ONE_WIRE_BUS); | |
| − | + | DallasTemperature sensors(&oneWire); | |
| − | + | ||
| − | </pre> | + | void setup(void) |
| + | { | ||
| + | Serial.begin(9600); | ||
| + | Serial.println("Dallas Temperature IC Control Library Demo"); | ||
| + | |||
| + | sensors.begin(); | ||
| + | } | ||
| + | |||
| + | void loop(void) | ||
| + | { | ||
| + | Serial.print(" Requesting temperatures..."); | ||
| + | sensors.requestTemperatures(); | ||
| + | Serial.println("DONE"); | ||
| + | |||
| + | Serial.print("Temperature for Device 1 is: "); | ||
| + | Serial.print(sensors.getTempCByIndex(0)); | ||
| + | |||
| + | delay(500); | ||
| + | }</pre> | ||
== 树莓派 == | == 树莓派 == | ||
| − | |||
| − | |||
=== 电路连接 === | === 电路连接 === | ||
| − | * | + | *[[File:实验十:DS18B20温度传感器实验_接线说明.png|500px]] |
| + | |||
=== 程序运行 === | === 程序运行 === | ||
| − | |||
==== Python ==== | ==== Python ==== | ||
| + | * 安装gpiozero库 | ||
| + | **可以使下面命令来安装该库 | ||
| + | <pre> | ||
| + | sudo apt update | ||
| + | sudo apt install python3-gpiozero | ||
| + | </pre> | ||
| + | :*其它树莓派上的系统可以使下面命令来安装该库: | ||
| + | <pre> | ||
| + | sudo pip3 install gpiozero | ||
| + | </pre> | ||
| + | :*运行以下语句可以查看树莓派GPIO口定义 | ||
| + | <pre> | ||
| + | pinout | ||
| + | </pre> | ||
| + | *相关配置 | ||
| + | **打开 1-Wire总线 | ||
| + | <pre> | ||
| + | sudo raspi-config | ||
| + | 选择Interfaces oOptions -> 1-Wire -> Would you like the one-wire interface to be enabled?选择Yes -> “The one-wire interface is enabled” 选择Yes -> 选择finish | ||
| + | </pre> | ||
| + | :*重启树莓派系统 | ||
| + | <pre> | ||
| + | sudo reboot | ||
| + | </pre> | ||
| + | :*安装设备驱动程序并确认设备是否有效 | ||
| + | <pre> | ||
| + | sudo modprobe w1-gpio | ||
| + | sudo modprobe w1-therm | ||
| + | cd /sys/bus/w1/devices/ | ||
| + | ls | ||
| + | </pre> | ||
| + | ::*[[File:实验十:DS18B20温度传感器实验_1.png|800px]] | ||
| + | ::*28-0000004145bb 是一个外部温度传感器设备的序列号,但它可能会随每个设备而变化。因为 DS18B20 温度传感器的序列号是唯一的。 | ||
| + | ::*注意:需要记一下设备序列号,需要在程序中做对应修改 | ||
| + | :*检查当前温度 | ||
| + | <pre> | ||
| + | cd 28-0000004145bb | ||
| + | ls | ||
| + | </pre> | ||
| + | ::*[[File:实验十:DS18B20温度传感器实验_2.png|800px]] | ||
| + | :*查看设备数据 | ||
| + | <pre> | ||
| + | cat w1_slave | ||
| + | </pre> | ||
| + | ::*[[File:实验十:DS18B20温度传感器实验_3.png|800px]] | ||
| + | ::*第二行t=24437为当前温度值,如果要将其转换为摄氏度,可以除以1000,则当前温度=24437/1000=24.44℃ | ||
| + | *下载树莓派参考例程,将文件解压后拷贝放在用户名目录下, | ||
| + | **修改工程文件:打开对应文件 raspberrypi/10/python_gpiozero/sensor.py | ||
| + | ***将第五行的DS18B20 = '28-0000004145bb' 更改为上面查询到的设备地址,然后保存文件 | ||
| + | ***[[File:实验十:DS18B20温度传感器实验_4.png|800px]] | ||
| + | **运行 | ||
| + | <pre> | ||
| + | cd raspberrypi/10/python_gpiozero | ||
| + | python sensor.py | ||
| + | </pre> | ||
| + | *此时可看见树莓派在正确运行DS18B20程序不断打印检测到的温度值,若想退出,按ctrl+C即可 | ||
| + | *更多指令请查看[https://gpiozero.readthedocs.io/en/latest/installing.html gpiozero文档] | ||
| − | + | == 例程下载 == | |
| + | * [[:File:Basic Experiment Kits For Arduino.zip|Arduino例程]] | ||
| + | * [[:File:Basic Experiment Kits For Raspberry Pi.zip|树莓派5例程 python]] | ||
== 相关例程 == | == 相关例程 == | ||
{{Arduino and Raspberry Pi Case}} | {{Arduino and Raspberry Pi Case}} | ||
2024年12月6日 (五) 11:54的最新版本
Arduino
实验现象
- 串口打印出检测的温度值。
电路连接

安装库
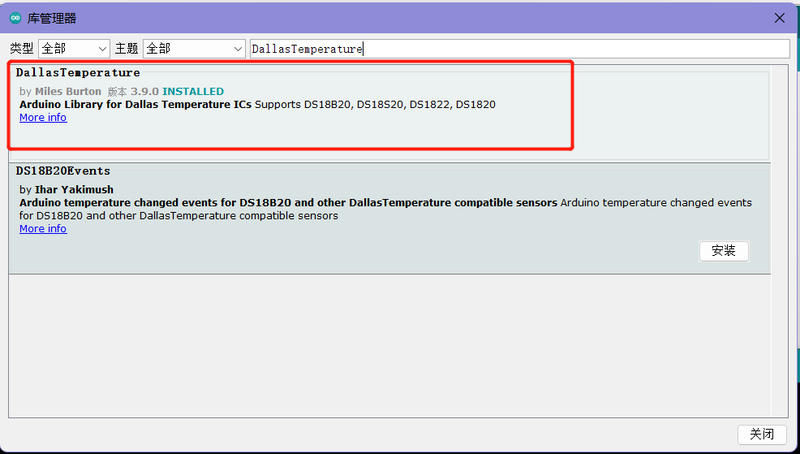
- 安装DallasTemperature
- 工具->管理库,搜索DallasTemperature,点击安装
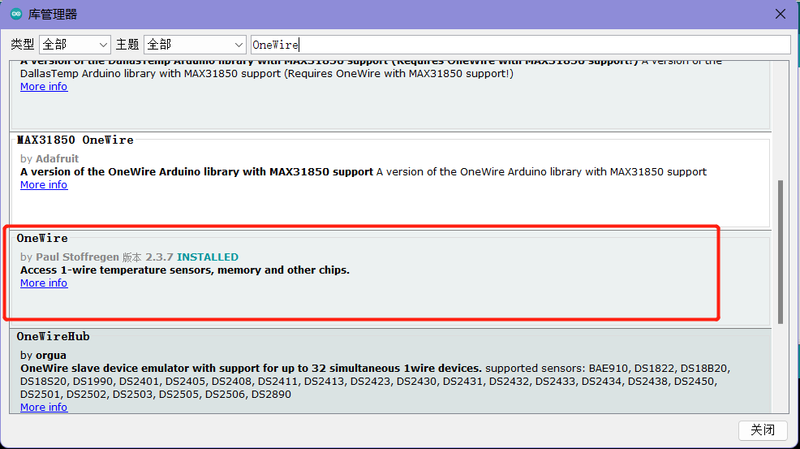
- 安装OneWire
- 工具->管理库,搜索OneWire,点击安装


主要程序
#include <OneWire.h>
#include <DallasTemperature.h>

#define ONE_WIRE_BUS 2
OneWire oneWire(ONE_WIRE_BUS);
DallasTemperature sensors(&oneWire);

void setup(void)
{
  Serial.begin(9600);
  Serial.println("Dallas Temperature IC Control Library Demo");

  sensors.begin();
}

void loop(void)
{
  Serial.print(" Requesting temperatures...");
  sensors.requestTemperatures();
  Serial.println("DONE");

  Serial.print("Temperature for Device 1 is: ");
  Serial.print(sensors.getTempCByIndex(0));

  delay(500);
}
树莓派
电路连接

程序运行
Python
- 安装gpiozero库
- 可以使下面命令来安装该库
sudo apt update
sudo apt install python3-gpiozero
- 其它树莓派上的系统可以使下面命令来安装该库:
sudo pip3 install gpiozero
- 运行以下语句可以查看树莓派GPIO口定义
pinout
- 相关配置
- 打开 1-Wire总线
sudo raspi-config
选择Interfaces oOptions -> 1-Wire -> Would you like the one-wire interface to be enabled?选择Yes -> “The one-wire interface is enabled” 选择Yes -> 选择finish
- 重启树莓派系统
sudo reboot
- 安装设备驱动程序并确认设备是否有效
sudo modprobe w1-gpio
sudo modprobe w1-therm
cd /sys/bus/w1/devices/
ls
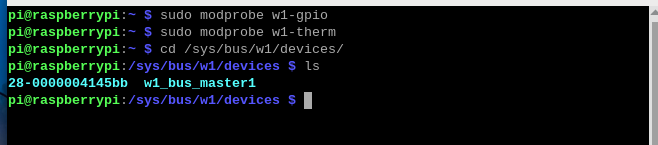
- 28-0000004145bb 是一个外部温度传感器设备的序列号,但它可能会随每个设备而变化。因为 DS18B20 温度传感器的序列号是唯一的。
- 注意:需要记一下设备序列号,需要在程序中做对应修改
- 检查当前温度

cd 28-0000004145bb
ls
- 查看设备数据

cat w1_slave

- 第二行t=24437为当前温度值,如果要将其转换为摄氏度,可以除以1000,则当前温度=24437/1000=24.44℃

- 下载树莓派参考例程,将文件解压后拷贝放在用户名目录下,
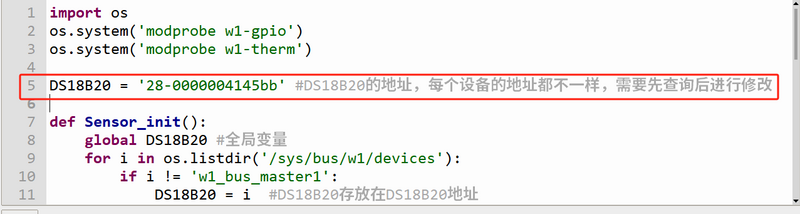
- 修改工程文件:打开对应文件 raspberrypi/10/python_gpiozero/sensor.py
- 将第五行的DS18B20 = '28-0000004145bb' 更改为上面查询到的设备地址,然后保存文件
- 运行
- 修改工程文件:打开对应文件 raspberrypi/10/python_gpiozero/sensor.py

cd raspberrypi/10/python_gpiozero
python sensor.py
- 此时可看见树莓派在正确运行DS18B20程序不断打印检测到的温度值,若想退出,按ctrl+C即可
- 更多指令请查看gpiozero文档