“实验三:旋转电位器实验”的版本间的差异
来自丢石头百科
Yousimaier17(讨论 | 贡献) (创建页面,内容为“首页 == Arduino == === 实验现象 === * 通过串口打印电位器滑动端的电压值 === 电路连接 === * 旋转电…”) |
Yousimaier17(讨论 | 贡献) (→电路连接) |
||
| (未显示同一用户的6个中间版本) | |||
| 第1行: | 第1行: | ||
| − | [[Basic Experiment Kits For Arduino | + | *[[Basic Experiment Kits For Arduino]] |
| + | *[[Basic Experiment Kits For Raspberry Pi]] | ||
== Arduino == | == Arduino == | ||
=== 实验现象 === | === 实验现象 === | ||
| 第5行: | 第6行: | ||
=== 电路连接 === | === 电路连接 === | ||
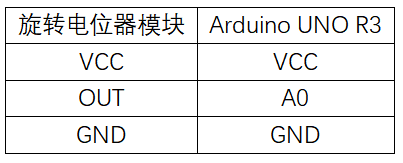
| − | * | + | *[[File:实验三:旋转电位器实验_接线.png|500px]] |
| − | |||
| − | |||
| − | |||
| − | |||
=== 主要程序 === | === 主要程序 === | ||
| 第36行: | 第33行: | ||
== 树莓派 == | == 树莓派 == | ||
| − | |||
| − | |||
=== 电路连接 === | === 电路连接 === | ||
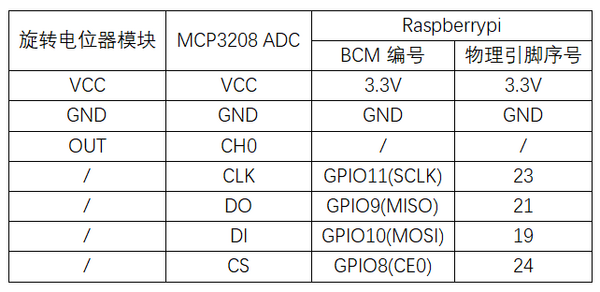
| − | * | + | *[[File:实验三:旋转电位器实验_接线2.png|600px]] |
| + | |||
=== 程序运行 === | === 程序运行 === | ||
| − | |||
==== Python ==== | ==== Python ==== | ||
| + | * 安装gpiozero库 | ||
| + | **可以使下面命令来安装该库 | ||
| + | <pre> | ||
| + | sudo apt update | ||
| + | sudo apt install python3-gpiozero | ||
| + | </pre> | ||
| + | :*其它树莓派上的系统可以使下面命令来安装该库: | ||
| + | <pre> | ||
| + | sudo pip3 install gpiozero | ||
| + | </pre> | ||
| + | :*运行以下语句可以查看树莓派GPIO口定义 | ||
| + | <pre> | ||
| + | pinout | ||
| + | </pre> | ||
| + | *打开SPI接口 | ||
| + | <pre> | ||
| + | sudo raspi-config | ||
| + | 选择Interfaces oOptions -> SPI -> “Would you like the SPI interface to be enabled? ”选择Yes -> “The SPI interface is enabled” 选择Yes -> 选择finish | ||
| + | </pre> | ||
| + | *关闭树莓派。断电情况下,根据提供的电路连接将对应模块接入电路,启动树莓派 | ||
| + | *下载树莓派参考例程,将文件解压后拷贝放在用户名目录下,运行 | ||
| + | <pre> | ||
| + | cd /home/pi/raspberrypi/3/python_gpiozero | ||
| + | python Potentiometer.py | ||
| + | </pre> | ||
| + | *此时可看见树莓派在不断打印电位器的电压值,若想退出,按ctrl+C即可 | ||
| + | *更多指令请查看[https://gpiozero.readthedocs.io/en/latest/installing.html gpiozero文档] | ||
| − | + | == 例程下载 == | |
| + | *[[:File:Basic Experiment Kits For Arduino.zip|Arduino例程]] | ||
| + | * [[:File:Basic Experiment Kits For Raspberry Pi.zip|树莓派5例程 python]] | ||
== 相关例程 == | == 相关例程 == | ||
{{Arduino and Raspberry Pi Case}} | {{Arduino and Raspberry Pi Case}} | ||
2024年12月6日 (五) 11:51的最新版本
Arduino
实验现象
- 通过串口打印电位器滑动端的电压值
电路连接
主要程序
#define Pot A0                        //电位器引脚命名

int PotBuffer = 0;                    //AD读取数据缓存变量

void setup()
{
  Serial.begin(9600);                 //初始化串口波特率为9600
}

void loop()
{
  PotBuffer = analogRead(Pot);        //读取AD值
  Serial.print("Pot = ");             //串口输出“Pot = ”
  Serial.println(PotBuffer);          //串口输出PotBuffer的值
  delay(500);                         //延时500ms
  Serial.print("Value = ");           //串口输出"Value = "
  Serial.print(PotBuffer*5.0/1024);   //串口输出计算后的电压值
  Serial.println("V");                //串口输出"V"
  delay(500);                         //延时500ms
}
树莓派
电路连接
程序运行
Python
- 安装gpiozero库
- 可以使下面命令来安装该库
sudo apt update
sudo apt install python3-gpiozero
- 其它树莓派上的系统可以使下面命令来安装该库:
sudo pip3 install gpiozero
- 运行以下语句可以查看树莓派GPIO口定义
pinout
- 打开SPI接口
sudo raspi-config
选择Interfaces oOptions -> SPI -> “Would you like the SPI interface to be enabled? ”选择Yes -> “The SPI interface is enabled” 选择Yes -> 选择finish
- 关闭树莓派。断电情况下,根据提供的电路连接将对应模块接入电路,启动树莓派
- 下载树莓派参考例程,将文件解压后拷贝放在用户名目录下,运行
cd /home/pi/raspberrypi/3/python_gpiozero
python Potentiometer.py
- 此时可看见树莓派在不断打印电位器的电压值,若想退出,按ctrl+C即可
- 更多指令请查看gpiozero文档

