“实验三十二:LCD1602 IIC显示实验”的版本间的差异
来自丢石头百科
Yousimaier17(讨论 | 贡献) |
Yousimaier17(讨论 | 贡献) |
||
| (未显示同一用户的1个中间版本) | |||
| 第34行: | 第34行: | ||
==== 主要程序 ==== | ==== 主要程序 ==== | ||
<pre> | <pre> | ||
| − | + | #include <Wire.h> | |
| − | #include <Wire.h> | + | |
| − | + | void setup() { | |
| − | + | Wire.begin(); | |
| − | + | Serial.begin(9600); | |
| − | + | Serial.println("\nI2C Scanner"); | |
| − | |||
| − | |||
| − | |||
| − | |||
} | } | ||
| − | + | ||
| − | void loop() | + | void loop() { |
| − | { | + | byte error, address; |
| − | + | int nDevices; | |
| − | + | Serial.println("Scanning..."); | |
| − | + | nDevices = 0; | |
| − | + | for (address = 1; address < 127; address++ ) { | |
| − | delay( | + | // The i2c_scanner uses the return value of |
| + | // the Write.endTransmisstion to see if | ||
| + | // a device did acknowledge to the address. | ||
| + | Wire.beginTransmission(address); | ||
| + | error = Wire.endTransmission(); | ||
| + | if (error == 0) { | ||
| + | Serial.print("I2C device found at address 0x"); | ||
| + | if (address < 16) | ||
| + | Serial.print("0"); | ||
| + | Serial.print(address, HEX); | ||
| + | Serial.println(" !"); | ||
| + | nDevices++; | ||
| + | } else if (error == 4) { | ||
| + | Serial.print("Unknow error at address 0x"); | ||
| + | if (address < 16) | ||
| + | Serial.print("0"); | ||
| + | Serial.println(address, HEX); | ||
| + | } | ||
| + | } | ||
| + | if (nDevices == 0) | ||
| + | Serial.println("No I2C devices found\n"); | ||
| + | else | ||
| + | Serial.println("done\n"); | ||
| + | delay(5000); // wait 5 seconds for next scan | ||
} | } | ||
</pre> | </pre> | ||
| 第87行: | 第106行: | ||
== 树莓派 == | == 树莓派 == | ||
=== 电路连接 === | === 电路连接 === | ||
| − | *[[File:实验三十二:LCD1602 IIC显示实验_接线2.png| | + | *[[File:实验三十二:LCD1602 IIC显示实验_接线2.png|600px]] |
| − | + | ||
=== 程序运行 === | === 程序运行 === | ||
==== Python ==== | ==== Python ==== | ||
2025年1月17日 (五) 11:13的最新版本
目录
模块说明
对比度调节
- 通过在VO引脚接入电位器进行对比度调节,其中:
- 对比度最大时显示:
- 对比度最小时显示:
- 对比度最大时显示:
- 当调节电位器至合适位置后,显示如下情况时:
- 检查接线是否松动
- 检查初始化程序是否正确


背光选择
- 可通过A K引脚是否接入VCC和GND,来控制是否背光显示。
- 引脚A接入VCC,引脚K接入GND,打开背光时
- 引脚A断开VCC或者引脚K端开GND,关闭背光时
- 引脚A接入VCC,引脚K接入GND,打开背光时


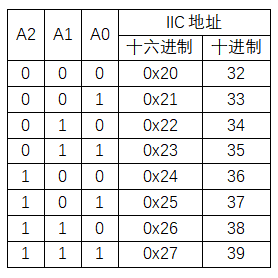
地址选择
- 设备地址可通过三位拨码开关A0、A1、A2进行修改,具体如下:

Arduino
电路连接

扫描设备IIC地址
实验现象
- 串口打印PCF8574的地址
主要程序
#include <Wire.h>

void setup() {
  Wire.begin();
  Serial.begin(9600);
  Serial.println("\nI2C Scanner");
}

void loop() {
  byte error, address;
  int nDevices;
  Serial.println("Scanning...");
  nDevices = 0;
  for (address = 1; address < 127; address++ ) {
    // The i2c_scanner uses the return value of
    // the Write.endTransmisstion to see if
    // a device did acknowledge to the address.
    Wire.beginTransmission(address);
    error = Wire.endTransmission();
    if (error == 0) {
      Serial.print("I2C device found at address 0x");
      if (address < 16)
        Serial.print("0");
      Serial.print(address, HEX);
      Serial.println(" !");
      nDevices++;
    } else if (error == 4) {
      Serial.print("Unknow error at address 0x");
      if (address < 16)
        Serial.print("0");
      Serial.println(address, HEX);
    }
  }
  if (nDevices == 0)
    Serial.println("No I2C devices found\n");
  else
    Serial.println("done\n");
  delay(5000); // wait 5 seconds for next scan
}
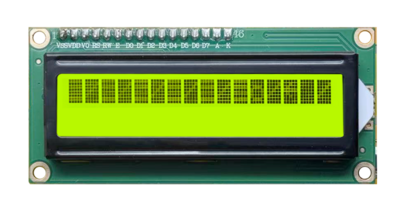
LCD显示
实验现象
- LCD1602第一行显示LCD1602 iic Test
- LCD1602第二行显示by Diustou
主要程序
//LingShun lab
#include <Wire.h>
#include <LiquidCrystal_I2C.h> //引用I2C库

LiquidCrystal_I2C lcd(0x20,16,2);  //此处修改IIC地址

void setup()
{
  lcd.init();                  // 初始化LCD
  lcd.backlight();             //设置LCD背景等亮
}

void loop()
{
  lcd.setCursor(0,0);                //设置显示指针
  lcd.print("LCD1602 iic Test");     //输出字符到LCD1602上
  lcd.setCursor(0,1);
  lcd.print("      by DIUSTOU");
  delay(1000);
}
树莓派
电路连接

程序运行
Python
- 安装gpiozero库
- 可以使下面命令来安装该库
sudo apt update
sudo apt install python3-gpiozero
- 其它树莓派上的系统可以使下面命令来安装该库:
sudo pip3 install gpiozero
- 运行以下语句可以查看树莓派GPIO口定义
pinout
- 打开IIC接口
sudo raspi-config
选择Interfaces oOptions -> I2C -> “Would you like the ARM I2C interface to be enabled?”选择Yes -> “The ARM I2C interface isenabled” 选择OK -> 选择finish
- 关闭树莓派。断电情况下,根据提供的电路连接将对应模块接入电路,启动树莓派
- 查询LCD1602的地址
ls /dev/i2c-*
sudo i2cdetect -y 1
- 下载树莓派参考例程,将文件解压后拷贝放在用户名目录下,运行
cd raspberrypi/32/python_gpiozero
python Display.py
- 此时可看见树莓派在正确运行程序,若想退出,按ctrl+C即可
- 更多指令请查看gpiozero文档