ESP32-C3-MINI (SMD)
目录
安装
安装前准备
我们建议您使用您喜欢的IDE安装支持,但根据您的操作系统,还有其他选项可用。要安装Arduino-ESP32支持,您可以使用以下选项之一。
注意
中国用户可能在使用GitHub时遇到连接和下载速度问题。请使用我们的Jihulab镜像作为仓库源: https://jihulab.com/esp-mirror/espressif/arduino-esp32.git
https://jihulab.com/esp-mirror/espressif/arduino-esp32.git
使用Arduino IDE安装(推荐)
这是直接从Arduino IDE安装Arduino-ESP32的方法。
注意
有关SoC支持的概述,请查看支持的SoC表格,您可以在其中找到特定芯片是处于稳定版还是开发版发布状态。
- 稳定版链接:
https://espressif.github.io/arduino-esp32/package_esp32_index.json
- 开发版链接:
https://espressif.github.io/arduino-esp32/package_esp32_dev_index.json
中国用户可能在使用上述链接时遇到连接和下载速度问题。请使用我们的Jihulab镜像:
- 稳定版链接:
https://jihulab.com/esp-mirror/espressif/arduino-esp32/-/raw/gh-pages/package_esp32_index_cn.json
- 开发版链接:
注意
从Arduino IDE版本1.6.4开始,Arduino允许使用开发板管理器安装第三方平台包。我们提供适用于Windows、macOS和Linux的软件包。
要使用开发板管理器开始安装过程,请按照以下步骤操作:
- 安装1.8级或更高版本的当前上游Arduino IDE。当前版本位于arduino.cc网站。
- 启动Arduino并打开首选项窗口。
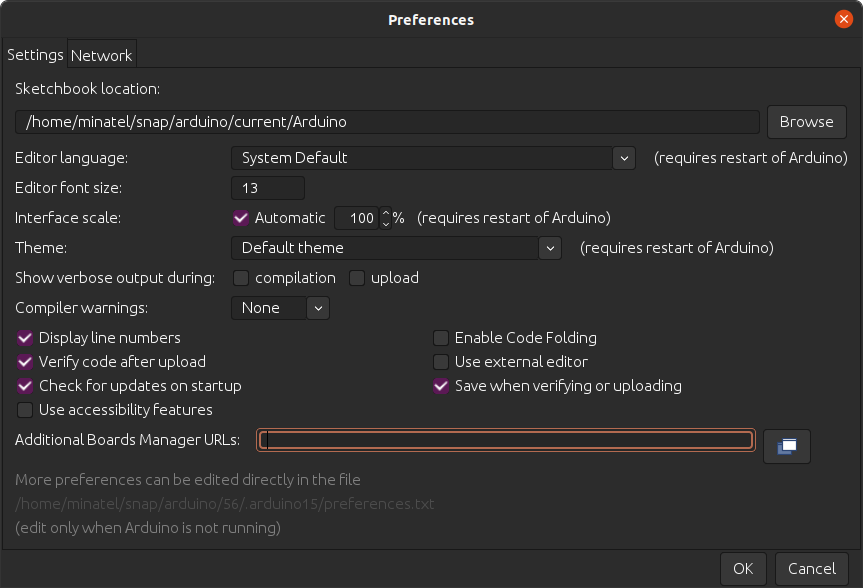
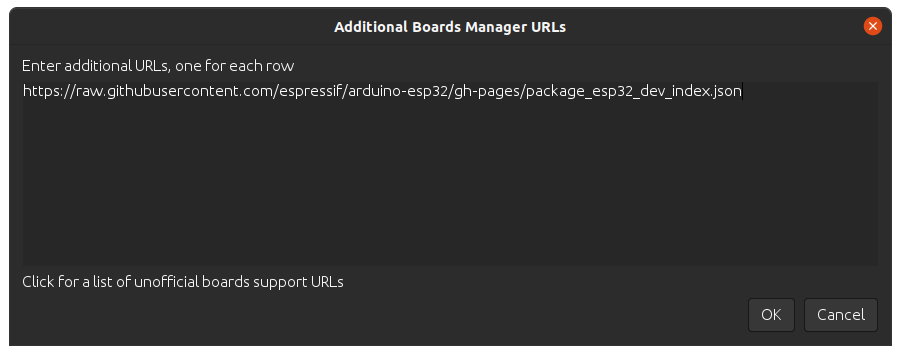
- 在"附加开发板管理器URL"字段中输入上述发布链接之一。您可以添加多个URL,用逗号分隔。
- 从工具 > 开发板菜单打开开发板管理器,安装esp32平台(安装后不要忘记从工具 > 开发板菜单中选择您的ESP32开发板)。

中国用户必须选择带有"-cn"后缀的软件包版本,并手动执行更新。此地区不支持自动更新,因为它们针对的是没有"-cn"后缀的默认软件包,这会导致下载失败。
- 重启Arduino IDE。
Windows(手动安装)
警告
Arduino ESP32核心v2.x.x不能在Windows 8.x x86(32位)、Windows 7或更早版本上使用。Windows 32位操作系统不再受此工具链支持。 Arduino ESP32 v1.0.6仍然可以在WIN32上工作。您可能需要安装python 3.8.x,因为它是Windows 7支持的最新版本。
在Windows上安装Arduino ESP32支持的步骤:
步骤1
- 从arduino.cc下载并安装最新的Arduino IDE Windows安装程序
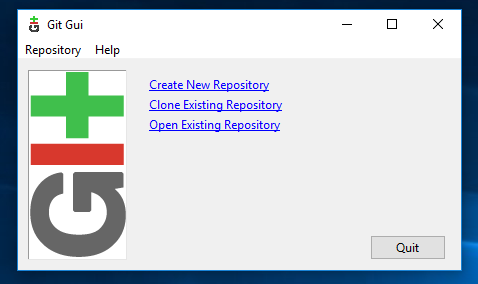
- 从git-scm.com下载并安装Git
- 启动Git GUI并执行以下步骤:
- 选择克隆现有仓库 Clone Existing Repository
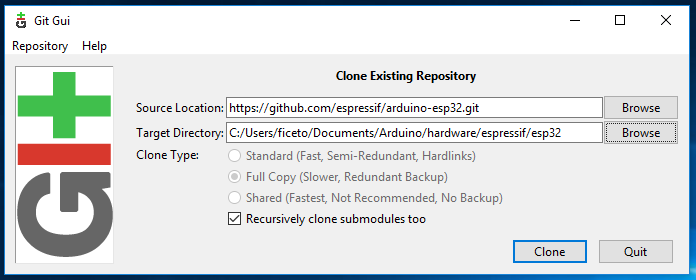
- 选择源和目标
- Sketchbook目录:通常是C:/Users/[您的用户名]/Documents/Arduino,在Arduino首选项中的"Sketchbook Location"下列出。
- 源位置:https://github.com/espressif/arduino-esp32.git
- 目标目录:[ARDUINO_SKETCHBOOK_DIR]/hardware/espressif/esp32
- 点击克隆Clone开始克隆仓库
步骤2
步骤3
- 打开指向[ARDUINO_SKETCHBOOK_DIR]/hardware/espressif/esp32的Git Bash会话,执行`git submodule update --init --recursive`
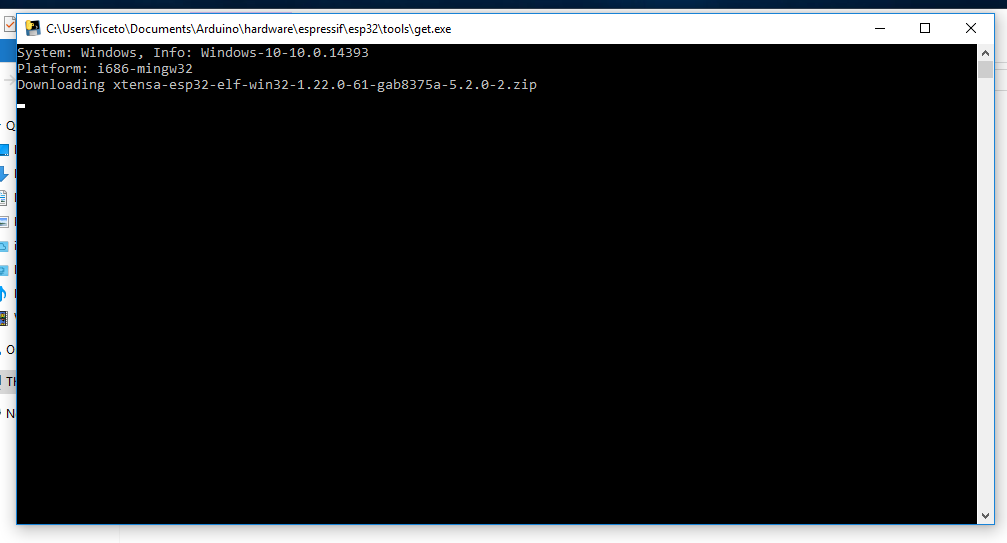
- 打开[ARDUINO_SKETCHBOOK_DIR]/hardware/espressif/esp32/tools并双击get.exe
打开指向[ARDUINO_SKETCHBOOK_DIR]/hardware/espressif/esp32的Git Bash会话,执行`git submodule update --init --recursive`
cd [ARDUINO_SKETCHBOOK_DIR]/hardware/espressif/esp32
git submodule update --init --recursive
打开[ARDUINO_SKETCHBOOK_DIR]/hardware/espressif/esp32/tools并双击get.exe
步骤4
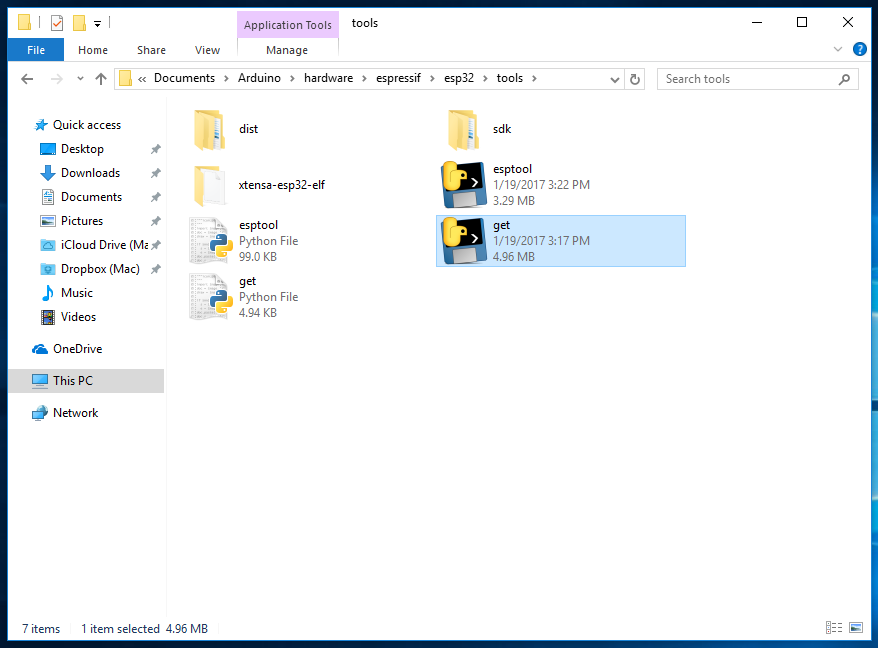
- 当`get.exe`完成时,您应该在目录中看到以下文件
步骤5
- 插入您的ESP32开发板并等待驱动程序安装(或手动安装可能需要的任何驱动程序)
- 启动Arduino IDE
- 在工具 > 开发板菜单中选择您的开发板
- 选择开发板连接的COM端口
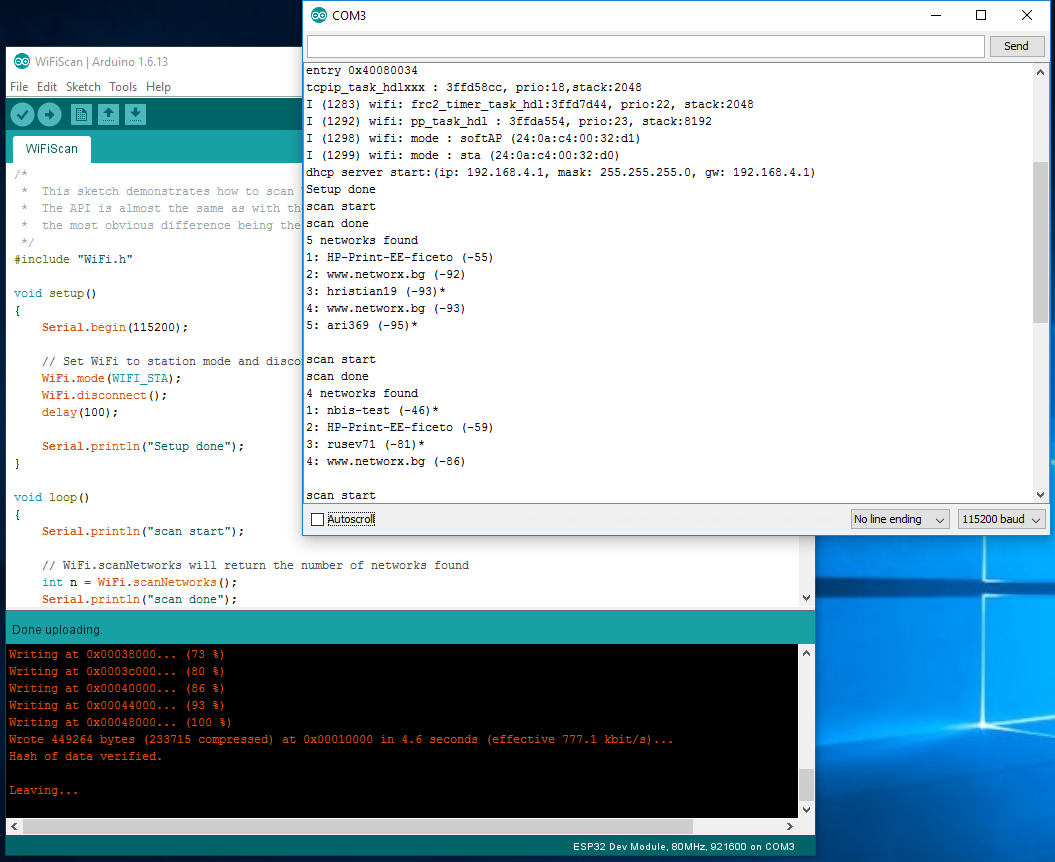
- 编译并上传(上传时可能需要按住boot按钮)
如何更新到最新代码
- 启动Git GUI,您应该在"打开最近的仓库(Open Recent Repository)"下看到该仓库。点击它!
- 从菜单Remote选择Fetch from > origin
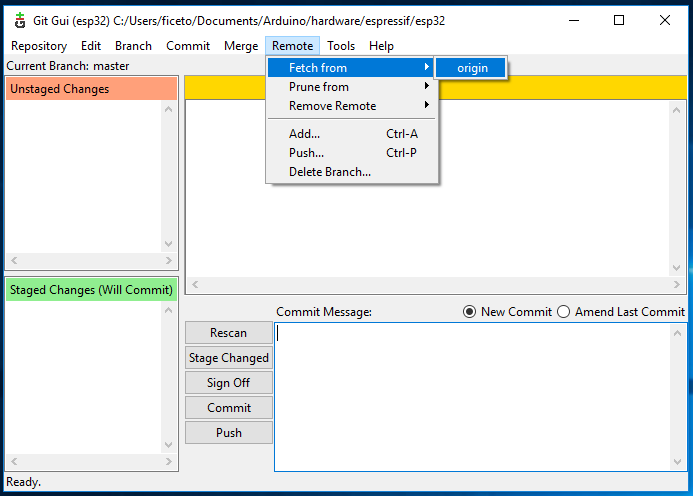
- 等待git拉取任何更改,然后关闭Git GUI
- 打开[ARDUINO_SKETCHBOOK_DIR]/hardware/espressif/esp32/tools并双击get.exe
Linux
Debian/Ubuntu
- 从arduino.cc安装最新的Arduino IDE。
- 打开终端并执行以下命令(复制 -> 粘贴并按回车):
sudo usermod -a -G dialout $USER && \
sudo apt-get install git && \
wget https://bootstrap.pypa.io/get-pip.py && \
sudo python3 get-pip.py && \
sudo pip3 install pyserial && \
mkdir -p ~/Arduino/hardware/espressif && \
cd ~/Arduino/hardware/espressif && \
git clone https://github.com/espressif/arduino-esp32.git esp32 && \
cd esp32/tools && \
python3 get.py
- 重启Arduino IDE。
- 如果您已将Arduino安装到~/,请从mkdir -p ~/Arduino/hardware开始修改安装,如下所示:
cd ~/Arduino/hardware
mkdir -p espressif && \
cd espressif && \
git clone https://github.com/espressif/arduino-esp32.git esp32 && \
cd esp32/tools && \
python3 get.py
Fedora
- 从arduino.cc安装最新的Arduino IDE。
注意
命令$ sudo dnf -y install arduino很可能会安装旧版本。
$ sudo dnf -y install arduino
- 打开终端并执行以下命令(复制 -> 粘贴并按回车):
sudo usermod -a -G dialout $USER && \
sudo dnf install git python3-pip python3-pyserial && \
mkdir -p ~/Arduino/hardware/espressif && \
cd ~/Arduino/hardware/espressif && \
git clone https://github.com/espressif/arduino-esp32.git esp32 && \
cd esp32/tools && \
python get.py
- 重启Arduino IDE。
openSUSE
- 从arduino.cc安装最新的Arduino IDE。
- 打开终端并执行以下命令(复制 -> 粘贴并按回车):
sudo usermod -a -G dialout $USER && \
if [ `python --version 2>&1 | grep '2.7' | wc -l` = "1" ]; then \
sudo zypper install git python-pip python-pyserial; \
else \
sudo zypper install git python3-pip python3-pyserial; \
fi && \
mkdir -p ~/Arduino/hardware/espressif && \
cd ~/Arduino/hardware/espressif && \
git clone https://github.com/espressif/arduino-esp32.git esp32 && \
cd esp32/tools && \
python get.py
- 重启Arduino IDE。
macOS
- 从arduino.cc安装最新的Arduino IDE。
- 打开终端并执行以下命令(复制 -> 粘贴并按回车):
mkdir -p ~/Documents/Arduino/hardware/espressif && \
cd ~/Documents/Arduino/hardware/espressif && \
git clone https://github.com/espressif/arduino-esp32.git esp32 && \
cd esp32/tools && \
python get.py
其中~/Documents/Arduino代表您的Sketchbook目录,如"Arduino" > "首选项" > "Sketchbook Location"(在IDE启动后)中所示。相应地调整上述命令。
~/Documents/Arduino
- 如果您收到以下错误,请通过xcode-select --install安装命令行开发工具,然后再次尝试上述命令:
xcrun: error: invalid active developer path (/Library/Developer/CommandLineTools), missing xcrun at: /Library/Developer/CommandLineTools/usr/bin/xcrun
- 运行命令:
xcode-select --install
- 如果在运行python get.py时收到错误:IOError: [Errno socket error] [SSL: TLSV1_ALERT_PROTOCOL_VERSION] tlsv1 alert protocol version (_ssl.c:590),请尝试使用python3代替python
- 如果在运行python get.py时收到以下错误:urllib.error.URLError: <urlopen error SSL: CERTIFICATE_VERIFY_FAILED,请转到Macintosh HD > Applications > Python3.6文件夹(或任何其他python版本),并运行以下脚本:Install Certificates.command和Update Shell Profile.command
- 重启Arduino IDE。
使用
开启烧录模式
- 按住板上的BOOT按键(USB接口朝上方,左边的按键为BOOT按键,右边的按键为RST复位按键)
- 插入USB线
- 稍等片刻,松开BOOT按键
选择正确的开发板
请在菜单Arduino IDE -> Tools -> Board -> esp32中,选择ESP32-C3 Dev Module

打开USB的CDC模式
ESP32-C3-MINI 需要使能USB的CDC模式,才能正常下载和打印LOG,请在Arduino IDE的菜单

指定正确的端口
请在菜单Arduino IDE -> Tools -> Port中,选择系统探测到的开发板对应的端口
获得开发板信息
请在菜单Arduino IDE -> Tools 中,点击Get Board Info获得开发板的信息,如果端口选择正确,此时应该可以输出开发板的信息
GPIO 测试
官方参考: https://docs.espressif.com/projects/arduino-esp32/en/latest/api/gpio.html
遍历所有GPIO输出方波:ESP32C3_GPIO_TEST.INO ,使用示波器就可以看到各个GPIO的输出方波
WiFi与幻彩LED控制测试
编写ESP32S3 连接WiFi, 并根据状况使用GPIO8控制幻彩LED
- 修改SSID 成自己的WiFi名称
- 修改密码成对应SSID的密码
- 编译下载
- 打开串口监视器,复位开发板(按一下RST按键)就可以看到连接状态