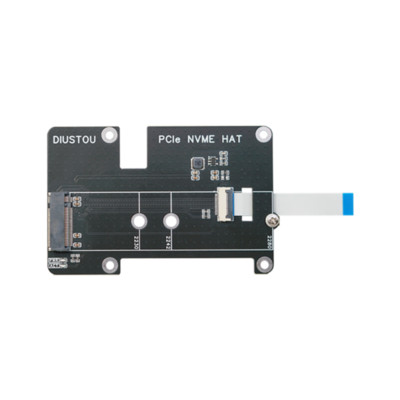
PCI-E NVME HAT For Raspberry Pi 5
From Diustou Wiki
Revision as of 11:15, 18 January 2025 by Yousimaier17 (talk | contribs) (Created page with "<div class="tabber"> {{Product |images=400px |categories= {{Category|Raspberrypi}} |brand=Diustou |features=PCI-E NVME...")
| ||||||||||||||||||||||
| ||||||||||||||||||||||
| ||||||||||||||||||||||
Contents
Product Introduction
- PCIe to M.2 M key adapter board designed for Raspberry Pi 5, compatible with 2230 / 2242 / 2280 size M.2 SSDs, supports Gen2 and Gen3 modes, and allows booting PI5 from SSD.
Product Features
- Supports NVMe protocol M.2 interface SSDs for high-speed read/write and efficient performance.
- Supports PCIe x1, with Gen2 and Gen3 modes available.
- Raspberry Pi 5 is not certified for Gen 3.0 speeds; connecting PCIe devices at Gen3 rates may result in instability.
- Only supports PI5B.
- SSD can be used as a boot drive or additional storage, or solely for storage expansion with the system booting from a TF card.
- Supports 2230/2242/2280 NVMe M.2 SSDs.
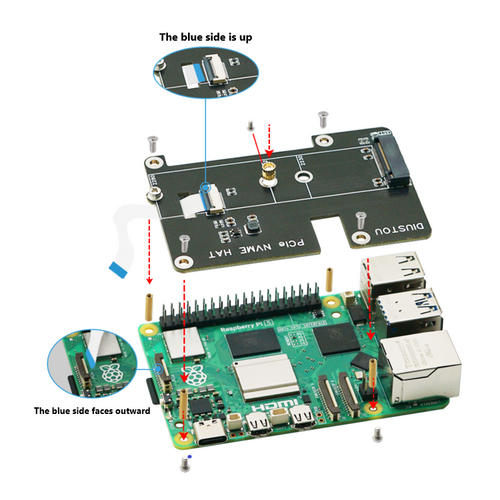
- Can be connected to PI5 via FFC cable, with power supplied directly from the FFC PCIe lane to the expansion board.
- The power circuit of the expansion board is designed for a 2A current. Due to the PCIe interface current limit of the Raspberry Pi 5 (5V 1A), it can provide an output of 3.3V 1.5A or more to the SSD.
- Typically, SSDs have a rated current of 2.5A, 2.7A, or even 3A, but these currents correspond to the X4 mode limit.
- Since the Raspberry Pi 5 only supports X1 mode, the actual current used is much less than the rated current.
- Onboard power indicator and read/write ACT indicator.
- Supports installation of the official active heatsink as well as third-party heatsinks.
Usage Instructions
Installation Instructions
As a Boot Drive
- This working mode requires modifying the onboard EEPROM of the Raspberry Pi.
- Booting via TF Card
- You need a TF card with the official Raspberry Pi system image burned onto it, and the image should be at least from October or December 2023 or later.
- Modify the config.txt on the TF Card
- The purpose of this step is to enable the use of the Raspberry Pi PCIe expansion board to write the image to the SSD.
- Insert the TF card into a Windows computer, navigate to the TF card, locate the config.txt file, and open it. Add the following code at the end of the file:
dtparam=pciex1
- PCIe is set to Gen2 by default. If you need to enable PCIe Gen3, add the following to /boot/firmware/config.txt::
dtparam=pciex1_gen=3
- *After making the changes, save the modifications and insert the TF card into Raspberry Pi 5.
- Write the System to the Solid State Drive
- Connect the interface of the expansion board to the PCIe interface of the Raspberry Pi 5 using an FPC (note that the FPC interface is keyed and must be inserted correctly).
- Ensure complete power-off at this time by unplugging the power supply, making sure that the power is not connected to the Raspberry Pi, otherwise the PCIe interface will remain powered on.
- After connecting the expansion board, power on the device and open Imager. If the official Imager is not available on your system, install it using the following command:
sudo apt install rpi-imager
- Open Imager, select the system you want to write (in addition to the official system, you can also choose Ubuntu or other systems) and choose the location to write to, which should be the solid state drive. You may be prompted to enter a password after starting, which is the password for logging into the Raspberry Pi. Enter it to begin the burning process.
- After the burning process is complete, do not unmount the drive. If it ejects automatically, you may need to restart the Raspberry Pi 5.
- Modify the config.txt on the Solid State Drive
- After the system is burned, locate the boot partition of the solid state drive in the file manager, and you may need to enter your password.
- Find and open the config.txt file, and add the following code at the end of the file:
dtparam=pciex1
- PCIE is set to gen2 by default. To enable PCIE gen3, add the following to /boot/firmware/config.txt:
dtparam=pciex1_gen=3
- Save the changes after modification.
Modify the EEPROM
- Enter the following in the terminal:
sudo rpi-eeprom-config --edit
- Open the EEPROM configuration file and modify the following two items:
BOOT_ORDER=0xf416
PCIE_PROBE=1
- Where PCIE_PROBE=1 indicates that a non-official HAT expansion board is being used.
- Restart the device once to apply the changes:
sudo reboot
- To ensure the changes have taken effect, you can reopen the EEPROM configuration file for inspection by repeating:
sudo rpi-eeprom-config --edit
- After confirming there are no errors, shut down the Raspberry Pi:
sudo shutdown -h now
- Install the Solid State Drive onto the PCIe Expansion Board
- Remove the TF card and install only the solid state drive, then power on the Raspberry Pi 5 and boot it up.
- You should see that it has successfully booted from the solid state drive, with hdparm testing showing read speeds of nearly 800MB/s and dd testing showing write speeds of nearly 400MB/s.
- 600px

As an External Storage Drive
- To use it solely as an external storage drive, you only need to modify the configuration file on the TF card.
- Enable the PCIE Interface
- The PCIE interface is not enabled by default on the PI5B, so you need to modify the config.txt on the TF card.
- Insert the TF card into a Windows computer, navigate to the TF card, find and open the config.txt file, and add the following code at the end of the file:
dtparam=pciex1
- You can also open the terminal in the Raspberry Pi system to configure the config.txt file:
sudo nano /boot/firmware/config.txt
Add the following line at the end of the file:
dtparam=pciex1
- PCIE is set to gen2 by default. To enable PCIE gen3, add the following in /boot/firmware/config.txt:
dtparam=pciex1_gen=3
- Save the changes after modification.
- The solid state drive will be recognized after powering on and booting
- Restart the PI5 to recognize the device.
- Partitioning
- If the SSD has already been partitioned and formatted on another platform, skip this step (caution: this will delete all data on the SSD).
lsblk  # can show the disks
sudo fdisk -l # to view detailed information
sudo fdisk /dev/nvme0n1   # to partition, use the overall device number without adding p1

How to use the fdisk partitioning tool:
n	# to create a new partition
q	# to quit without saving
p	# to print the partition table
m	# to print the menu of options
d	# to delete a partition
w	# to save and exit
t	# to change the ID number
To add a partition, simply execute n, and finally w to save and exit
- Formatting
sudo mkfs.
Then press tab to see many different suffixes, each suffix representing a different format you can choose to format to.
Assuming you want to format to the ext4 file system, you would execute:
sudo mkfs.ext4 /dev/nvme0n1p1
Wait for a moment, and when "done" appears, it means the formatting is complete.\
- Mounting
# Create a mount directory
sudo mkdir toshiba
# Mount the device
sudo mount /dev/nvme0n1p1 ./toshiba
# Check the disk status
df -h
- /dev/nvme0n1p1 设备名, /home/pi/toshiba 挂载到目录,ext4是文件系统类型 ,defaults 使用默认的挂载选项
- 使更改生效(测试无问题再重启,不然会导致无法挂载导致无法开机)
sudo mount -a
- 然后重启
通过lsblk检查设备
- Automatic Mounting
- If testing shows no issues and you only need it as an additional disk without being used as the system disk, set up automatic mounting:
sudo nano /etc/fstab

# Add the following line at the end:
/dev/nvme0n1p1  /home/pi/toshiba  ext4  defaults  0  0
#/dev/nvme0n1p1 is the device name, /home/pi/toshiba is the mount point directory, ext4 is the file system type, and defaults are the default mounting options.
# Apply the changes (reboot only if testing shows no issues, otherwise it may cause failure to mount and prevent booting)
sudo mount -a

# Then reboot
Check the device using lsblk
- Read/Write Speed Test
- Enter the directory of the mounted disk
cd toshiba
- Free up memory
sudo sh -c "sync && echo 3 > /proc/sys/vm/drop_caches"
- Copy content from Raspberry Pi memory to the hard drive (write)
sudo dd if=/dev/zero of=./test_write count=2000 bs=1024k
- Copy content from the hard drive to Raspberry Pi memory (read from /etc/fstab)
sudo dd if=./test_write of=/dev/null count=2000 bs=1024k
- Note: Different cards and environments may yield different test results, and the Raspberry Pi can be significantly affected. For accurate performance testing, use a PC.

