树莓派智能车AlphaBot教程8:webiopi(上集)
webiopi是一个可控制树莓派GPIO的web框架,webiopi官网已经不再更新,官网上最新版本0.7.1版本,而且这个版本是不支持树莓派2B及以后版本的。尽管webiopi不再更新但是我们也介绍一下,通过学习webiopi让我们更快的熟悉web网页控制。
webiopi涉及到HTML,javacript,jquery,CSS等,如果各位阅读遇到不懂的可以先了解一下相关知识。
webiopi官网:
http://webiopi.trouch.com/
我们提供的软件是可以用在树莓派3B上的,不要到官网下载。官网有相关的教程,各位可以到官网查看。但是由于总所周知的原因,如果没有一些“科学的软件"有可能不能正常查看。
Webiopi安装
下载AlphaBot2的程序里面有WebIOPi-0.7.1-raspi2.进入到相应的目录运行如下命令安装。
=== cpp代码: ===
cd AlphaBot2/lib/WebIOPi-0.7.1-raspi2
sudo ./setuo.sh
验证是否安装成功:执行 webiopi–h,如果出现以下界面,说明库安装成功
终端执行:
=== cpp代码: ===
sudo webiopi -d -c /etc/webiopi/config
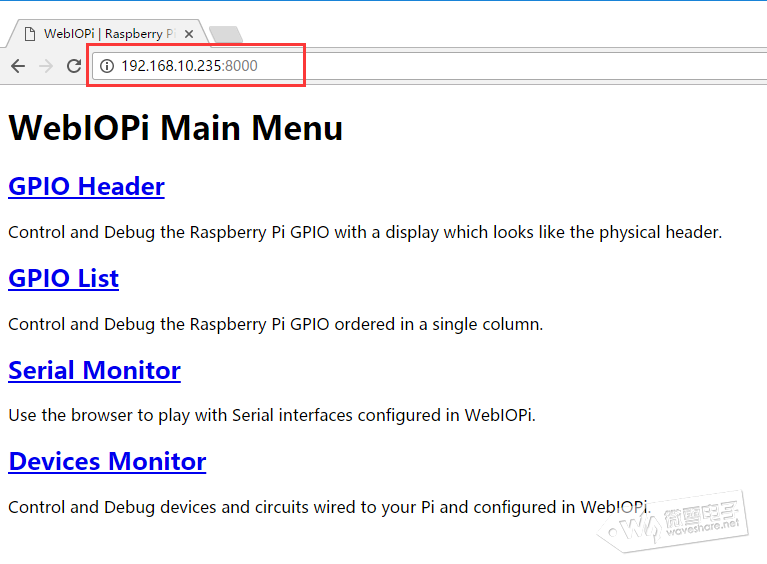
然后在电脑端或者手机端打开网页浏览器,在地址栏内输入树莓派 ip 地址,端口号 8000。 例如:http://192.168.10.235:8000(根据实际情况填入)。在登录网站时,需要输入账号和密码,默认的账号和密码分别是:webiopi 和 raspberry。如果进入 WebIOPi说明环境配置成功了.
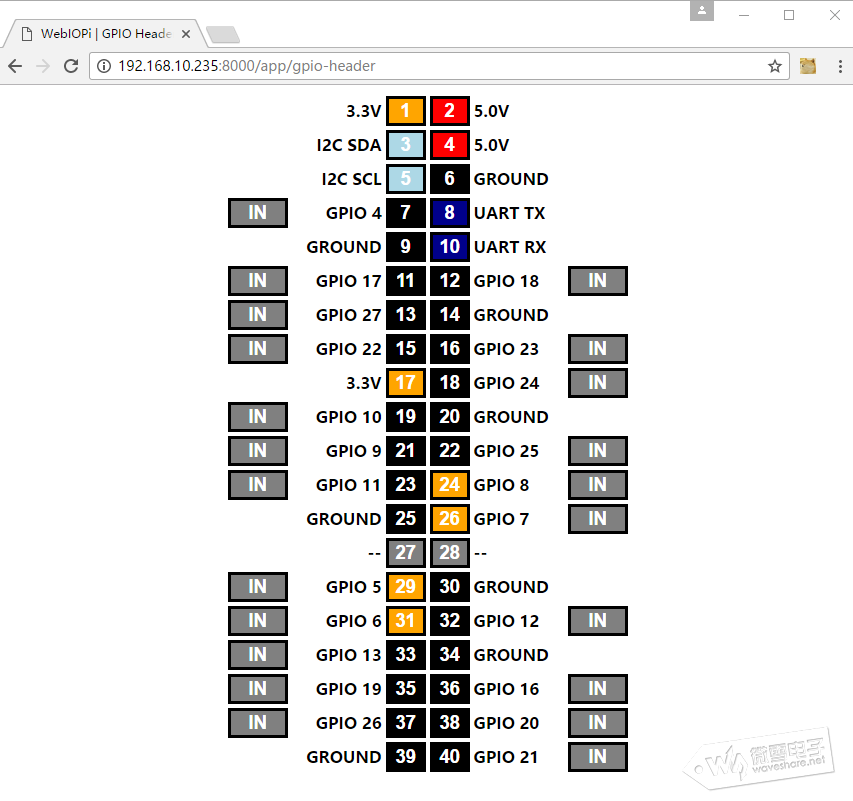
点击”GPIO Header”,出现如下页面,可在页面中控制GPIO的电平。
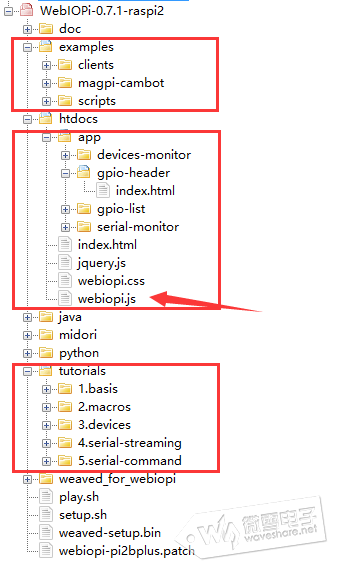
我们先首先了解一下webiopi的目录结构,我们说一下主要的,其他次要的不需要了解。
webiopi目录结构如上图,tutorials目录下为一写基础的教程示例,examples为一下综合例程,app目录下位刚才我们打开主页目录用到的东西,启动index.html为刚才打开的主页,点击”GPIO Header”就会显示gpio-header文件夹下的index.html页面。 其中jquery.js为JQuery库,jQuery 是一个 JavaScript 库。这个可以在网上下载。 webiopi.css为CSS文件,可以理解为HTML的格式文件,网页的显示样式由这个文件定义。 webiopi.js这个文件比较重要,我们可以使用哪写函数可以查看这个文件。
在使用webiopi之前先了解一下webiopi的配置文件。webiopi的默认配置文件为/etc/webiopi/config
下面详细讲解一下各个配置的作用。
1.GPIO初始化
=== cpp代码: ===
[GPIO]
# Initialize following GPIOs with given function and optional value
# This is used during WebIOPi start process
#21 = IN
#23 = OUT 0
#24 = OUT 0
#25 = OUT 1
【作用】 webiopi运行之后立即设置GPIO端口的状态,例如输入还是输出,若是输出的话输出高电平还是低电平
2.GPIO重置
=== cpp代码: ===
[~GPIO]
# Reset following GPIOs with given function and optional value
# This is used at the end of WebIOPi stop process
#21 = IN
#23 = IN
#24 = IN
#25 = OUT 0
【作用】 webiopi结束运行之前,设置GPIO状态。该设置最好和GPIO初始化相对应,更确切的说恢复所有的GPIO为输入。
3.载入脚本
=== cpp代码: ===
[SCRIPTS]
# Load custom scripts syntax :
# name = sourcefile
# each sourcefile may have setup, loop and destroy functions and macros
#myscript = /home/pi/webiopi/examples/scripts/macros/script.py
【作用】 script.py可理解为一个主文件,主文件中包含3大块内容,setup loop和destroy。webiopi运行之后的顺序依次是:setup运行一次,webiopi运行时loop连续运行,webiopi运行结束之前destroy运行一次。script.py文件的主要功能存在于loop中,在没有网页操作时,loop中的相关操作也会运行。
4.HTTP服务
=== cpp代码: ===
# HTTP Server configuration
enabled = true
port = 8000

# File containing sha256(base64("user:password"))
# Use webiopi-passwd command to generate it
passwd-file = /etc/webiopi/passwd

# Change login prompt message
prompt = "WebIOPi"

# Use doc-root to change default HTML and resource files location
#doc-root = /home/pi/webiopi/examples/scripts/macros

# Use welcome-file to change the default "Welcome" file
#welcome-file = index.html
【作用】 1.使能或者禁止HTTP服务 2.设置HTTP服务的端口号,默认为8000,注意由于存在web各种web服务器(apache或者lighttpd),所有请勿使用80端口。 3.设置登录用户名和密码,若是新手建议不用修改。 4.设置html文件目录(请注意是目录而不是文件)。该设置经常会被修改。
5.CoAP服务
=== cpp代码: ===
# CoAP Server configuration
enabled = true
port = 5683
# Enable CoAP multicast
multicast = true
【作用】 1.使能CoAP服务 2.CoAP的默认端口为5683,不建议修改。
6.载入设备
=== cpp代码: ===
[DEVICES]
# Device configuration syntax:
# name = device [args...]
# name : used in the URL mapping
# device : device name
# args : (optional) see device driver doc
# If enabled, devices configured here are mapped on REST API /device/name
# Devices are also accessible in custom scripts using deviceInstance(name)
# See device driver doc for methods and URI scheme available

# Raspberry native UART on GPIO, uncomment to enable
# Don't forget to remove console on ttyAMA0 in /boot/cmdline.txt
# And also disable getty on ttyAMA0 in /etc/inittab
#serial0 = Serial device:ttyAMA0 baudrate:9600

# USB serial adapters
#usb0 = Serial device:ttyUSB0 baudrate:9600
#usb1 = Serial device:ttyACM0 baudrate:9600

#temp0 = TMP102
#temp1 = TMP102 slave:0x49
#temp2 = DS18B20
#temp3 = DS18B20 slave:28-0000049bc218

#bmp = BMP085

#gpio0 = PCF8574
#gpio1 = PCF8574 slave:0x21

#light0 = TSL2561T
#light1 = TSL2561T slave:0b0101001

#gpio0 = MCP23017
#gpio1 = MCP23017 slave:0x21
#gpio2 = MCP23017 slave:0x22

#pwm0 = PCA9685
#pwm1 = PCA9685 slave:0x41

#adc0 = MCP3008
#adc1 = MCP3008 chip:1 vref:5
#dac1 = MCP4922 chip:1
【作用】 载入各种设备,由于设备暂缺未详细测试。


