Template:4.3inch DSI LCD User Manual
Contents
Features
- 4.3inch IPS screen. 800x480 hardware resolution
- Capacitive touch panel, support 5-point touch
- Supports Pi 4B/3B+/3A+/3B/2B/B+/A+. Another adapter board is required for CM3/3+
- DSI interface, refresh rate up to 60Hz.
- Supports Raspbian/Ubuntu/Kali and WIN 10 IoT, driver free.
User guide
Hardware connection
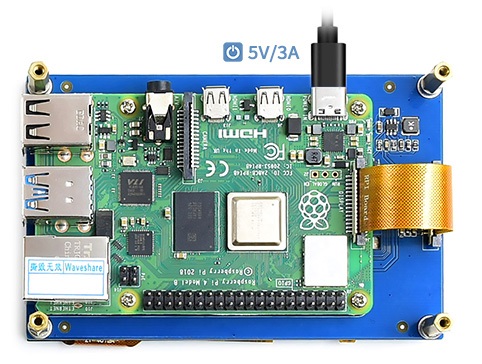
- Connect the DSI interface of 4.3inch DSI LCD to the DSI interface of Raspberry Pi.
- For easy use, you can fix the Raspberry Pi on the backside of the 4.3inch DSI LCD by screws
Software setting
1) Download image (Raspbian, Ubuntu, Kali, or WIN 10 IOT) from the Raspberry Pi website. https://www.raspberrypi.org/downloads/ 2) Download the compressed file to the PC, and unzip it to get the .img file. 3) Connect the TF card to the PC, use SDFormatter.exe software to format the TF card. 4) Open the Win32DiskImager.exe software, select the system image downloaded in step 2, and click‘Write’ to write the system image. 5) After the image has finished writing, save and quit the TF card safely. 6) Power on the Raspberry Pi and wait for a few seconds until the LCD displays normally. And the touch function can also work after the system starts.
Rotation
To change the orientation of the display, you can modify /boot/config.txt file as below
- Open the file
sudo nano /boot/config.txt
- Add the following code at the end of config.txt
- Rotate 90 degrees
display_lcd_rotate=1 dtoverlay=rpi-ft5406,touchscreen-swapped-x-y=1,touchscreen-inverted-x=1
- Rotate 180 degrees
display_lcd_rotate=2 dtoverlay=rpi-ft5406,touchscreen-inverted-x=1,touchscreen-inverted-y=1
- Rotate 270 degrees
display_lcd_rotate=3 dtoverlay=rpi-ft5406,touchscreen-swapped-x-y=1,touchscreen-inverted-y=1 If you use Raspberry Pi 4, you need to remove the line: dtoverlay=cv4-fkms-V3D
- Save and reboot Raspberry Pi
sudo reboot
Install virtual keyboard
Open terminal and install it by the following command
sudo apt-get install matchbox-keyboard
After installing, you can click Accessories -> Keyboard to open the keyboard.
