Difference between revisions of "Experiment 3: Rotary Potentiometer Experiment"
From Diustou Wiki
Yousimaier17 (talk | contribs) (Created page with "*Basic Experiment Kits For Arduino *Basic Experiment Kits For Raspberry Pi == Arduino == === Experimental Phenomenon === * Print the voltage value at the sliding end o...") |
Yousimaier17 (talk | contribs) |
||
| (One intermediate revision by the same user not shown) | |||
| Line 6: | Line 6: | ||
=== Circuit Connection === | === Circuit Connection === | ||
| − | *[[File:实验三:旋转电位器实验_接线.png| | + | *[[File:实验三:旋转电位器实验_接线.png|600px]] |
=== Reference Program === | === Reference Program === | ||
| Line 32: | Line 32: | ||
== Raspberry Pi == | == Raspberry Pi == | ||
=== Circuit Connection === | === Circuit Connection === | ||
| − | *[[File:实验三:旋转电位器实验_接线2.png| | + | *[[File:实验三:旋转电位器实验_接线2.png|800px]] |
=== Program Execution === | === Program Execution === | ||
Latest revision as of 13:58, 11 February 2025
Contents
Arduino
Experimental Phenomenon
- Print the voltage value at the sliding end of the potentiometer via serial port.
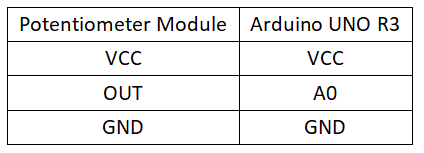
Circuit Connection
Reference Program
#define Pot A0 // Name the potentiometer pin

int PotBuffer = 0; // Buffer variable for AD reading data
void setup()
{
Serial.begin(9600); // Initialize serial port baud rate to 9600
}
void loop()
{
PotBuffer = analogRead(Pot); // Read AD value
Serial.print("Pot = "); // Output "Pot = " via serial port
Serial.println(PotBuffer); // Output the value of PotBuffer via serial port
delay(500); // Delay for 500ms
Serial.print("Value = "); // Output "Value = " via serial port
Serial.print(PotBuffer*5.0/1024); // Output the calculated voltage value via serial port
Serial.println("V"); // Output "V" via serial port
delay(500); // Delay for 500ms
}
Raspberry Pi
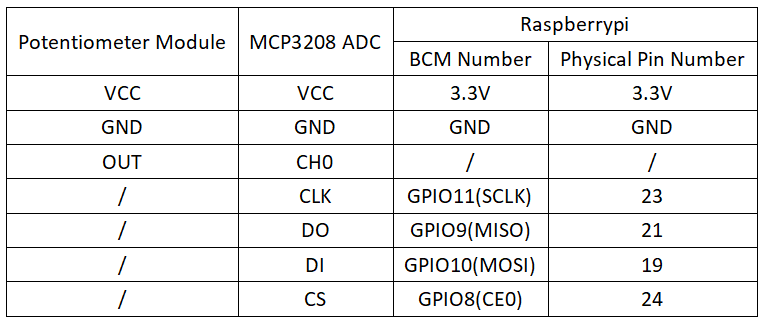
Circuit Connection
Program Execution
Python
- Install the gpiozero library
- You can install the library using the following command:
sudo apt update
sudo apt install python3-gpiozero
- For other systems on Raspberry Pi, you can install the library using the following command:
sudo pip3 install gpiozero
- Run the following command to view the GPIO pin definitions on the Raspberry Pi:
pinout
- Enable the SPI interface
sudo raspi-config
Select Interfaces Options -> SPI -> "Would you like the SPI interface to be enabled?" Choose Yes -> "The SPI interface is enabled" Choose Yes -> Select finish
- Shut down the Raspberry Pi. With the power off, connect the corresponding modules to the circuit according to the provided circuit diagram, then start the Raspberry Pi.
- Download the Raspberry Pi reference example, unzip the file, copy it to the user directory, and run:
cd /home/pi/raspberrypi/3/python_gpiozero
python Potentiometer.py
- At this point, you should see the Raspberry Pi continuously printing the voltage value of the potentiometer. To exit, press ctrl+C.
- For more commands, please refer to the gpiozero documentation

