Experiment 1: Traffic Light Experiment
From Diustou Wiki
Contents
Arduino
Experimental Phenomenon
- The green light is on for 5 seconds, then turns off, the yellow light flashes 3 times in a loop, the red light is on for 5 seconds, and the sequence repeats.
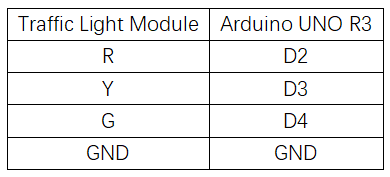
Circuit Connection
Reference Program
int red = 2;     //Define pin 2 as the interface
int yellow = 3;  //Define pin 3 as the interface
int green = 4;   //Define pin 4 as the interface

void setup()
{
  pinMode(red,OUTPUT);    //Set the red light pin as an output interface
  pinMode(yellow,OUTPUT); //Set the yellow light pin as an output interface  pinMode(green,OUTPUT);  //Set the green light pin as an output interface }

void loop()
{
  digitalWrite(green,HIGH);    //Turn on the green light
  delay(5000);                  //Delay for 5 seconds
  digitalWrite(green,LOW);      //Turn off the green light
  for(int i=0;i<3;i++)           //Flash the yellow light three times alternately
  {
delay(500);                //Delay for 0.5 seconds
digitalWrite(yellow,HIGH);  //Turn on the yellow light
    delay(500);                //Delay for 0.5 seconds
    digitalWrite(yellow,LOW);   //Turn off the yellow light
  }
  delay(500);                 //Delay for 0.5 seconds
  digitalWrite(red,HIGH);       //Turn on the red light
  delay(5000);                //Delay for 0.5 seconds
  digitalWrite(red,LOW);       //Turn off the red light
}
Raspberry Pi
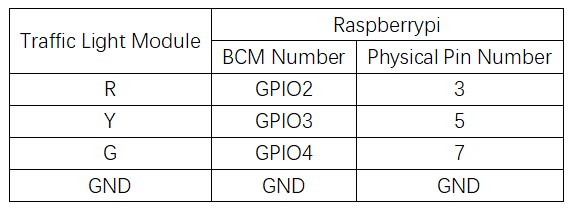
Circuit Connection
Program Execution
Python
- Install the gpiozero library
- You can use the following commands to install the library:
sudo apt update
sudo apt install python3-gpiozero
- For other systems on the Raspberry Pi, you can use the following command to install the library:
sudo pip3 install gpiozero
- Run the following command to view the GPIO pin definitions on the Raspberry Pi:
pinout
- Download the Raspberry Pi reference examples, unzip the file, copy it to your user directory, and run:
cd raspberrypi/1/python_gpiozero
python led.py
- You should now see the Raspberry Pi running a traffic light program. To exit, press ctrl+C.
- Command explanation: gpiozero.TrafficLights(red, amber, green, _options)
- Main parameters:
- red: The GPIO pin connected to the red LED
- amber: The GPIO pin connected to the amber LED
- green: The GPIO pin connected to the green LED
- pwm:
- If True, constructs PWMLED instances to represent each LED.
- If False (default), constructs regular LED instances.
- initial_value:
- If False (default), all LEDs are initially off.
- If "None", all LEDs are in an unstable initial state.
- If True, all LEDs are initially on.
- For more commands, please refer to the gpiozero documentation

