Experiment 28: Soil Moisture Sensor Experiment
From Diustou Wiki
Revision as of 17:28, 12 February 2025 by Yousimaier17 (talk | contribs) (Created page with "*Basic Experiment Kits For Arduino *Basic Experiment Kits For Raspberry Pi == Arduino == === Experimental Phenomenon === * Print the current soil status via serial por...")
Contents
Arduino
Experimental Phenomenon
- Print the current soil status via serial port.
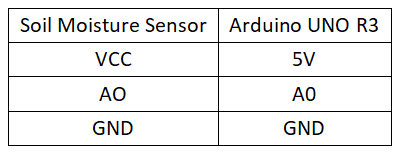
Circuit Connection
Dry/Wet Calibration
- Calibration instructions: Define a measurement range by reading the sensor values in air and in water, respectively.
- Open the Serial Monitor and set the baud rate to 9600 according to the program.
- Dry calibration: Place the sensor in air and read the analog value, which represents the reading when dry. Record this value.
- Wet calibration: Take a glass of water and insert the sensor to a certain depth (make a mark). This depth should be the same as the depth you will insert it into the soil. Be sure not to exceed the white line on the module! Record the analog value read at this time, which represents 100% humidity. (The output data is inversely proportional to humidity, with the smallest output in water.)
Program Description
- The program sensor1 is a basic serial print program that can be used for calibration measurements.
- The program sensor2 is an application program for the module. The values of AirValue and WaterValue used in the program are obtained from measurements in dry and wet environments using program sensor1.
Reference Program
const int AirValue = 620;
const int WaterValue = 308;
int intervals = (AirValue - WaterValue)/3;
int soilMoistureValue = 0;

void setup()
{
  Serial.begin(9600);
}

void loop()
{
  soilMoistureValue = analogRead(A0);
  if(soilMoistureValue > WaterValue && soilMoistureValue < (WaterValue + intervals))
  {
    Serial.println("非常潮湿");
  }
  else if(soilMoistureValue > (WaterValue + intervals) && soilMoistureValue < (AirValue - intervals))
  {
    Serial.println("湿润");
  }
  else if(soilMoistureValue < AirValue && soilMoistureValue > (AirValue - intervals))
  {
    Serial.println("干燥");
  }
  delay(2000);
}
Raspberry Pi
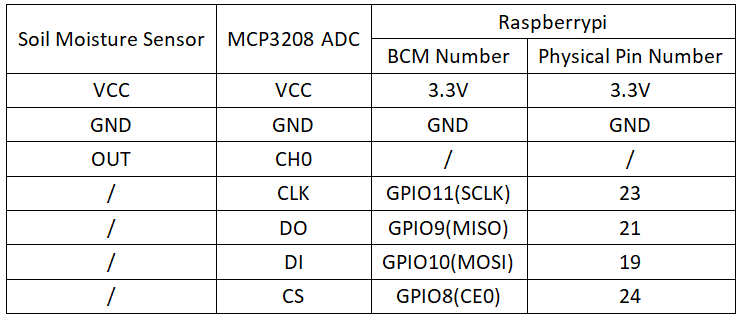
Circuit Connection
Program Execution
Python
- Install the gpiozero library
- You can use the following command to install the library:
sudo apt update
sudo apt install python3-gpiozero
- For other systems on the Raspberry Pi, you can use the following command to install the library:
sudo pip3 install gpiozero
- Run the following command to view the GPIO pin definitions on the Raspberry Pi:
pinout
- Enable the SPI interface
sudo raspi-config
Select Interfaces oOptions -> SPI -> “Would you like the SPI interface to be enabled? ”Select Yes -> “The SPI interface is enabled” Select Yes -> Select finish
- Shut down the Raspberry Pi. With the power off, connect the corresponding modules to the circuit according to the provided circuit connection, and then start the Raspberry Pi.
- Download the Raspberry Pi reference example, unzip the file, copy it to the user directory, and run it:
cd /home/pi/raspberrypi/28/python_gpiozero
python sensor.py
- At this point, you can see the Raspberry Pi continuously printing the voltage value of the potentiometer. To exit, press ctrl+C.
- For more commands, please refer to the gpiozero documentation

