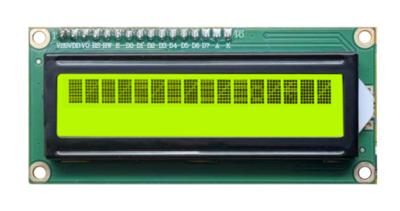
Experiment 32: LCD1602 IIC Display Experiment
From Diustou Wiki
Revision as of 17:58, 12 February 2025 by Yousimaier17 (talk | contribs) (Created page with "*Basic Experiment Kits For Arduino *Basic Experiment Kits For Raspberry Pi == Module Description == === Contrast Adjustment === *Adjust the contrast by connecting a po...")
Module Description
Contrast Adjustment
- Adjust the contrast by connecting a potentiometer to the VO pin, where:
- When the contrast is at its maximum, it displays:
- When the contrast is at its minimum, it displays:
- When the contrast is at its maximum, it displays:
- When the potentiometer is adjusted to an appropriate position, it displays as follows:
- Check if the wiring is loose.
- Check if the initialization program is correct.


Backlight Selection
- The backlight can be controlled by whether pins A and K are connected to VCC and GND.
- When pin A is connected to VCC and pin K is connected to GND, the backlight is on:
- When pin A is disconnected from VCC or pin K is disconnected from GND, the backlight is off:
- When pin A is connected to VCC and pin K is connected to GND, the backlight is on:


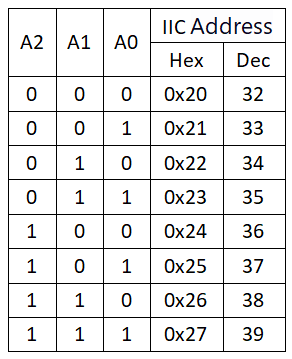
Address Selection
- The device address can be modified by the three-position DIP switch A0, A1, and A2, specifically as follows:

Arduino
Circuit Connection

Scanning I2C Device Addresses
Experimental Phenomenon
- Print the address of the PCF8574 via the serial port.
Reference Program
//LingShun lab
#include <Wire.h>
#include <LiquidCrystal_I2C.h> //Include I2C library

LiquidCrystal_I2C lcd(0x20,16,2);  //Modify I2C address here

void setup()
{
  lcd.init();                  //Initialize LCD
  lcd.backlight();             //Turn on LCD backlight
}

void loop()
{
  lcd.setCursor(0,0);               //Set display cursor
  lcd.print("LCD1602 iic Test");     //Output characters to LCD1602
  lcd.setCursor(0,1);
  lcd.print("      by DIUSTOU");
  delay(1000);
}
LCD Display
Experimental Phenomenon
- The first line of the LCD1602 displays "LCD1602 I2C Test"
- The second line of the LCD1602 displays "by Diustou"
Reference Program
//LingShun lab
#include <Wire.h>
#include <LiquidCrystal_I2C.h> /Include I2C library

LiquidCrystal_I2C lcd(0x20,16,2);   //Modify I2C address here

void setup()
{
  lcd.init();                 //Initialize LCD
  lcd.backlight();           //Turn on LCD backlight
}

void loop()
{
  lcd.setCursor(0,0);                //Set display cursor
  lcd.print("LCD1602 iic Test");      //Output characters to LCD1602
  lcd.setCursor(0,1);
  lcd.print("      by DIUSTOU");
  delay(1000);
}
Raspberry Pi
Circuit Connection

Program Execution
Python
- Install the gpiozero library
- You can use the following command to install the library:
sudo apt update
sudo apt install python3-gpiozero
- For other systems on the Raspberry Pi, you can use the following command to install the library:
sudo pip3 install gpiozero
- Run the following command to view the GPIO pin definitions on the Raspberry Pi:
pinout
- Enable the IIC interface
Select Interfaces oOptions -> I2C -> “Would you like the ARM I2C interface to be enabled?”Select Yes -> “The ARM I2C interface isenabled” Select OK -> Select finish
- Shut down the Raspberry Pi. With the power off, connect the corresponding modules to the circuit according to the provided circuit connection, and then start the Raspberry Pi.
- 查询LCD1602的地址
ls /dev/i2c-*
sudo i2cdetect -y 1
- Download the Raspberry Pi reference example, unzip the file, copy it to the user directory, and run it:
cd raspberrypi/32/python_gpiozero
python Display.py
- You can see the Raspberry Pi running the program correctly. To exit, press ctrl+C.
- For more commands, please refer to the gpiozero documentation